Category: Frugality

  • Solar Cooking Tips from a Pro

    Written by Marilyn

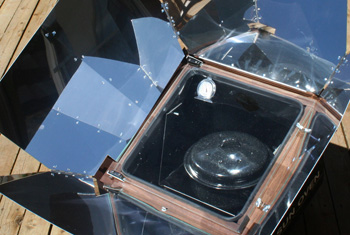
    My friends Tara Miller and Sam Brown have compiled numerous practical tips including a Five-Day Kitchen Diary to make cooking in the Global Sun Oven successful and fun.  Sun Ovens are the perfect way to keep a kitchen cool while reducing energy consumption during the hottest days of summer.

    Ed Note: They have been cooking most of their food in their Global Sun Oven year- around for 20 years even here in the coldest part of a Colorado winter.  They enthusiastically recommend Solar Cooking to everyone and practice what they preach as they own four sun ovens and have traveled to Peru to teach natives how to cook in it.

    What can you cook in a solar oven?
    A solar oven allows you to prepare a wide variety of high quality foods including vegetables, soups, stews, beans, desserts, breads, cakes, meats and more.

    Getting Started Basics:

    • Use black or dark cooking pots or cast iron.
    • Brush oil on fresh meat to assist with browning.
    • Soak dried beans, lentils, or grains in water overnight.
    • When cooking dry foods such as rice, use slightly less water than usual.
    • To cook vegetables: Preheat your dark pot that has a cover and use a small amount of water, about 1/3 cup. This accelerates the cooking process and also preserves vitamins. A covered pot keeps the moisture and heat in the pot.
    • For soups and stews:  Don’t put too much in one pot. It’s better to use two smaller pots.
    • Plan on a little more time to cook than for conventional stove top or oven baking.
    • Use a sunny, south facing location. Plan for a convenient shelter nearby such as a deck.
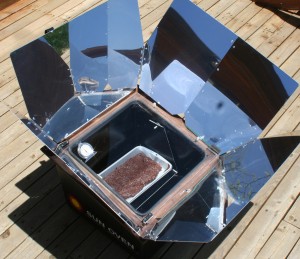
    • Prop the oven toward the sun so the sunlight strikes the glass at 90 degrees and adjust the oven toward the sun every 30 to 45 minutes for maximum temperature.
    • Best cooking hours are 10:00 am to 3:00 pm. but longer in the summer.
    • A folded towel placed over the glass when the food is done will hold food warm for a couple of hours.

    Baking Tips:  Baking normally will take longer than baking in a conventional oven.  For cornbread, preheat a cast iron skillet or baking pan for a crispy crust. For cakes, yeast breads or baked potatoes, wait for a clear day so you can keep the heat high and consistent.  Quick breads have been most reliable for me.  Yeast breads baked in smaller, darker colored baking pans bake best in the Sun Oven. These are a favorite bread pan.

    Stove Top Cooking Tips: Start the liquids heating up in the cooker ahead of time, or bring water or other liquids to a boil on a conventional stove top and then put the pot in the cooker. Also, preheat the cooking pot; the lid, and the rocks to keep the heat up.

    Lower temperature or simmering Tips: Adjust the Sun Oven slightly away from the direct sun. Simmering can happen even if the day is slightly overcast.


    Cooking while you’re away from home: Put your food (say a pot of seasoned, pre-soaked beans) in the well-propped cooker, adjusted for noon. Enjoy the satisfaction of coming home to a solar cooked meal ready to serve.

    Quick and Easy Ideas for a busy day:  Bake extra potatoes for frying later, cook chunks of squash, whole chicken, burritos, frozen foods, and precooked entrees.

    Diary From a Northern Hemisphere Kitchen by Tara Miller

    WEDNESDAY:

    Roast chicken in solar cooker. Dust a little paprika on top so the chicken isn’t so white. This will enhance the color to the surface of the meat. Place potatoes and carrots or other vegetables alongside the chicken for the last 20 minutes or so.  Refrigerate or freeze select meat (such as the breast meat). We ate with our fingers and feasted on the chicken, saving the bones and skin for soup stock.

    THURSDAY:

    Boil leftover chicken bones several hours or more to make stock. Adjust cooker regularly to keep it simmering.

    Lunch: Cold, diced chicken breast salad or sandwiches from yesterday’s leftovers.

    Supper: Chicken Soup: In the late afternoon,: strain and discard the bones, skim fat (Refrigerate or freeze part of broth for future use). Return about a quart of the broth to the cooker and add 1/4 cup barley, cook at least an hour. About 45 minutes before supper time add other vegetables: onion, garlic, carrots, green beans; later, add chopped chard. Season at the last minute with garden sage, thyme, salt.

    FRIDAY:

    Lunch: leftover soup, either cold or warmed in cooker.

    Midafternoon: Start the rice: bring 4 cups salted water to a boil in an oversized kettle  (the extra space will serve as a steamer later) in the solar cooker, add 2 cups brown rice. Position in slightly advanced to sun perfect position* and rice will cook with no further attention.

    Supper: When the rice is nearly done place quick cooking vegetables such as edible pea pods and chopped greens to steam on top of the rice and cover. To serve: Skim vegetables off the top of the rice and season creatively: Try garlic, olive oil and basil, or chutney, or plum sauce or whatever you have on hand.

    SATURDAY (This is a busy day diary and presumes the use of more than one cooker.)

    Early:     Set cookers in position facing where the sun will first strike.  Place an empty cast iron kettle with cover in one cooker to preheat for potatoes later.

    Breakfast: Leftover rice from the bottom of yesterday’s kettle. Fix it the way you eat your breakfast oatmeal or cold cereal with cream or yogurt, butter, maple syrup, brown sugar, nuts, dried fruits etc.

    Midmorning: Scrub potatoes and place in hot, preheated kettle or cast iron pot. Position in slightly advanced to sun perfect position* and potatoes will cook with no further attention.


    Lunch: Remove the hot baked potatoes. Leave kettle in cooker, readjust the solar cooker for full sun power. Eat baked potato bar with your favorite toppings such as bacon bits, shredded cheese, butter, chives, etc. Cool the rest of the potatoes and refrigerate. Leftover potatoes will be used either grated for breakfast hashbrowns and eggs, or made into potato salad later in the week.

    Throw corn on the cob in the kettle. This was tough corn, so I husked it and left the cooker at sun perfect position* so it would cook for about 45 minutes. Other options for afternoon cooking in that preheated kettle: whole beets, or  soup.

    * Sun-perfect position has the glass tilted exactly perpendicular to the angle of incoming sun light and with the shadow symmetrical behind the cooker. “Advanced” to sun perfect position has that shadow set so that “sun-perfect position” will come in about 20 minutes. My Sun Oven will bake at peak temperatures for 45 minutes to an hour with no further adjustments starting from this advanced position.

    SUNDAY

    Our little cherry tree has one final picking of sour red pie cherries. We preserved some of them by canning in the solar cooker.   Canning in a solar cooker is considered an advanced skill recommended for experienced solar oven enthusiasts only.  So I have not included the instructions.  If you want more information, please email me at marilyn@urbanhomemaker.com

    Cherry Cobbler

    Place four cups of juicy cherries in the bottom of black enamel 8 x 12 baking pan. For a festive touch, save out a handful to decorate the top.

    Stir into cherries either 2 tablespoons corn starch or 2 tablespoons quick cooking tapioca. If using tapioca, let it sit for at least 15 minutes.

    Mix crispy crust by:

    Cream together 1/2 cup butter with 3/4 cup brown sugar

    Sift together in a small bowl:

    1 cup flour

    1/4 teaspoon baking soda

    1/4 teaspoon baking powder

    1/4 teaspoon salt

    Mix flour mixtures with the butter/sugar mixture, then add:

    1 cup oatmeal


    Stir well and spread over the top of the cherries. Just for fun make a little drawing on top of the crust with the saved cherries. Consider that the dark color of the cherries may encourage more efficient absorption of solar radiation.

    Optional version is to put the entire crust UNDER the cherries. Be sure to soak the tapioca in the cherry juice at least 15 minutes:  Use 1 1/2 Tablespoons quick-cooking tapioca for each 1/2 cup juice.

    Best of all, Have Fun with your Global Sun Oven!
  • Going Solar: Cooking for FREE

    When I tell people that I purchased a solar oven they look at me funny, like they don’t get it. It’s almost as if they wonder how you plug it in. Or how do you get the sun to come into your kitchen where the oven is? YEP- I was asked this and once I explained the person didn’t believe me! But it is true and every time I use it I too am shocked. As of this week, I have used my Sun Oven about 3x a week. I have enjoyed not worrying about dinner (since I thought about it earlier!)  nor a hot kitchen ( which will inevitably end summer cooking). I almost go into a camping mindset.. No rules, cooking freedom, etc


    Why did we buy a solar oven?
    1.      Free energy! Seriously, that was part of it.
    2.      Camping
    3.      Emergency use
    4.      Ease of use (think of a crock pot you don’t plug in)
    5.      Novelty (hello, it’s a SOLAR oven)

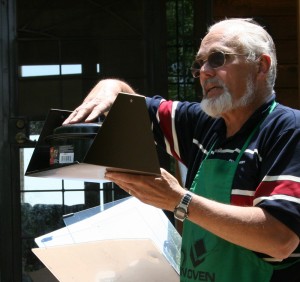
    We liked our solar oven so much that we contacted the company that makes the Global Sun Oven to become a reseller. Is it turns out the owner of the company was on vacation in Western Colorado and came to our home to conduct a training seminar with a crowd of about 20 people. We met in the breezeway and learned quite a bit. Here are some photos!


    A solar oven is designed for a useful life of about 30 years. There are no burners to go out and very few moving parts. A large portion of these ovens are sold overseas in developing countries, so simplicity, ease of use and durability are a key feature (and benefit).
    Here are some points which may answer your questions:

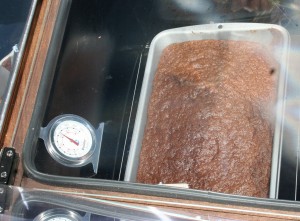
    • Food cooks at 178 degrees F. Anything above that will cook. Yes, adjusting cooking time may be slightly longer, but I had brownies cook in 30 min when the oven temp was 350 degrees!
    • Treat the wood top with Linseed oil every 2 yrs if it is left to the elements.
    • It is hot! Yes, use oven mitts! The glass, cooking pots, and the metal inside are hot if the oven is on.
    • Dog proof? Yes- Dogs don’t like their noses burned anymore than you like your fingers! The glass can be hot.
    • For every oven sold in the USA a portion goes into equipping others in deforested countries where fuel is a premium.
    • The reflectors can be scratched or just plain old and beat up – and they will still work!
    • The reflectors can be wiped with a Norwex cloth or simply use Windex.. However I thought no chemicals was best.
    • It is easy! Yes,  It was scarey until I actually used it for the 1st time. Every time after has been E-A-S-Y!
    • Any recipe you like to cook can probably be cooked in this Sun Oven.
    • Sun Ovens make a perfect vehicle to have a personal challenge. This is my personal challenge and so far, I just have to readjust my thinking on timing. Also I am not so burned out in the morning as I am in the evening.. so it has helped with meal planning!


    Points from our newsletter below!

    • A solar oven heats up quickly and can be used in summer and winter. You can cook at temperatures as low a 8 degrees F.
    • A solar oven cooks food evenly and will not dry your food out. This is one of the most amazing things about the way it cooks. The heat in the unit surrounds the cooking area and cooks from all sides. You can even hard boil eggs without boiling them. Eggs placed on a pan will become hard-unboiled (in just 30min!) just like hard boiled eggs. That’s because the heat around the egg is an even heat – just like when boiling.
    • A solar oven won’t burn your food either. Rice or baked beans in a pot will not get that hard burned layer at the bottom, because there is no flame at the bottom burning the items.

    Here’s what we learned in our test kitchen, or south facing deck for this project…

    Pre-heating ( all of 7 minutes) began after breakfast; the oven was placed towards the sun (obvious, I know) and positioned as the owner’s manual suggests.

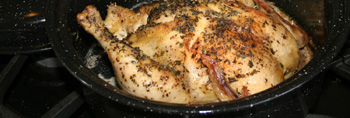
    I placed a FROZEN 4lb. chicken with seasonings into the 3QT pot and when I placed it in the oven, it was at 300 degrees. I was pleasantly surprised that this little 20 pound cooker really puts out the heat!

    My frozen chicken cooked from 11:45am to 4:15pm. The smell around the Sun Oven was delectable! The roasted chicken smelled wonderful, looked gorgeous, and was fully cooked and made a perfect dinner!

    I have several more test case scenarios to put to the test- however so far the concept is wonderful. The ability to actually cook a frozen chicken with little to no effort using the free energy of the sun was downright fun.

    Brownies are wonderful. I used my own recipe. They cooked beautifully in 30 min.

    I wish I had taken a photo of my frozen rock of a round roast. Yes- As I ran out the door to take the kids to swimming lessons the thought came to me.. Put a frozen roast inthe Sun Oven, pour BBQ sauce over the top, and wha la- have no stress for dinner. So I went about my day, took the roast out around 5:45pm and served wonderful BBQ Beef Sandwiches for dinner.Serve with  Cole Slaw, and a fruit salad.

    BBQ Sauce:

  • SAUCE:
  • 1/2 cup ketchup
  • 1/2 cup chili sauce
  • 1/4 cup packed brown sugar
  • 2 tablespoons cider vinegar
  • 2 tablespoons Worcestershire sauce
  • 1 teaspoon liquid smoke flavoring (optional)
  • 1/2 teaspoon ground mustard
  • ** put half on the meat, save half for serving**
  • Cole Slaw:

  • 1/2 cup brown sugar
  • 1/2 cup apple cider vinegar
  • 1/2 cup mayonnaise
  • 1 teaspoon celery seed
  • 4 cups chopped cabbage ( Use both green and purple cabbage or a Broccoli slaw mix)
  • Directions

    1. In a large bowl, whisk together the brown sugar, apple cider vinegar, mayonnaise, and celery seed. Add cabbage and toss to coat.  This is a very basic slaw recipe. I end up adding seeds, nuts, noodles, or dried fruit to make it right for the taste buds!

    Fruit Salad: ( Yummy Yummy!- Can you tell I am a mother to young kids?)

    • Add any fruit you have, cut into bite sized pieces. Mix together
    • Dollop vanilla yogurt as dressing OR equal parts yogurt/orange juice with crystallized ginger chopped up through out. Having this made early so flavors can mingle is best, but not required!

    For more information and recipes for our solar ovens visit our web site here.

    Do you get our newsletter? Join here and get a free e-book “Steps to the Best Bread”.

  • Coconut Oil is Queen Among Saturated Fats

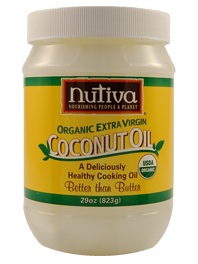
    Since I have had several inquiries, recently, I wanted to explain how I use coconut oil, the benefits of using coconut oil in everyday cooking and baking, and a few reader testimonials.

    I first discovered that Coconut Oil is a healthy fat about five years ago when I read Eat Fat Lose Fat by Sally Fallon Morrel, President of Weston A Price Foundation, and Dr Mary Enig, International Expert on the Biochemstry of Food and Fat.

    Here are some ways I use coconut oil in baking:

    Melt it and measure it like regular oil.  The melting point for coconut oil is 76 degrees.

    If you use it in salad dressing – mix it with olive oil, at least half and half since it wants to be a solid – don’t refrigerate it – it will get really solid.

    I use it to saute veggies of all kinds.

    I especially like to use Coconut oil  in baked goods – bread – muffins-pancakes-brownies- Marilyn’s Famous Whole Wheat Bread, etc.  I have found when I use Coconut Oil in homemade bread it does not mold readily when stored at room temperature for many days.

    I also use it as a skin lotion for chapped lips and dry, cracked places on my feet because it is pure and natural and very effective. You will  get the benefits of coconut oil through your skin when applied topically.

    I transitioned into using the Extra Virgin Coconut Oil because my family commented that the taste and flavor of the foods I had prepared  were so much better when I used Coconut Oil.   Eventually it just became a habit as I used it more and more.

    Check out how and why others are using coconut oil.

    Sally Fallon Morrel says that “coconut is queen” among saturated fats because:
    • Coconut Contains Abundant Medium-Chain Fatty Acids – medium chain fatty acids digest more easily than long chain fatty acids so it is an excellent choice for people having digestive difficulties with fats.
    • Coconut Oil Contains Significant amounts of Lauric Acid – Lauric Acid, also found in mother’s milk, has proven antiviral, antibacterial, and antifungal properties.  This substance helps  stimulate the immune system and helps your body fight off viruses, bacteria and other pathogens, and protect you from other diseases.  Lauric acid is highly beneficial and is only found in coconut oil, palm kernel oil, and in a small percentage of butterfat.
    • Coconut Oil is Synergistic with Essential Fatty Acids – Although popular media would want you to think all saturated fats are bad, that is not true.  When our bodies consume saturated fats t it reduces the body’s need for essential fatty acids – both the omega-3 and omega –6’s.

    Healthy Popcorn
    1. Use 2-3 Tbsp organic virgin coconut oil into your pre-heated stove top popcorn popper (I use an old beat up 4 qt pressure cooker) using high heat.
    2. Drop 3-4 kernels into the melting oil.  When those kernels pop add the rest of your popcorn.
    3. Add 1/2 to 3/4 Cup popcorn depending on the size of your cooker  (If you use organic popcorn it probably won’t be GMO)
    4. After popping the corn, remove the pot from the heat, pour the corn into a large mixing bowl or popcorn bowl.
    5. Drizzle about 2-3 Tbsp melted butter over the popped corn and sprinkle with Real Salt or sea salt to taste. Mix  the butter and salt around well  and serve.

    Don’t feel guilty about using plenty of healthy fats!  They offer satiety, and keep you from snacking on unhealthy junk as well as many other health benefits.

  • Local Foods to Local Markets

    Do you LOVE Farmer’s Markets and participate in your local market as a producer or a consumer?

    Today I want to talk about ways you can help promote and support your local agricultural economy especially in Colorado.  If passed, Colorado would join nearly 20 other states (plus 5 pending!) who already support cottage industry food production.

    A bill recently introduced in the Colorado Senate would increase consumer access to local fresh and value-added agricultural products by permitting home and community kitchens to easily register to legally produce and sell low-risk foods.

    The goal is to encourage local farmers and small producers as entrepreneurs to spur economic development in Colorado communities.

    Provisions in the bill include:
    • It will allow consumers to purchase these products made with quality ingredients grown by their neighbors and other local farmers.
    • It will benefit our communities by keeping money circulating close to home.
    • It will encourage Coloradans to purchase nutritious food in their communities
    • It will allow local growers to be more profitable by utilizing products left over after market day, seconds, and surplus production
    • It will help local communities achieve self-sufficiency and sustainability
    • It will reduce the number of miles food is transported from farm to fork
    In Colorado and in other states it is now it’s up to us.  We must contact our Senators and Congressman  by phone or email—letters will not arrive in time.
    I would love to hear from those of you in other states who have successfully passed or benefited from similar legislation.
    In Colorado:

    1)  Contact all members of the Senate Agriculture Committee  to voice your support.  Please thank Senator Schwartz in Colorado, the Ag Committee Chair, for crafting/sponsoring this bill.

    2)  The Senate Ag Committee will hear this bill in Denver Thursday, April 28th at 1:30 PM.  If you can testify let Senator Schwartz know.  (Contact info in her email attached below.)  If you want to carpool from the Western Slope, please let me know as well.

  • Making Bone Broth Video Demonstration


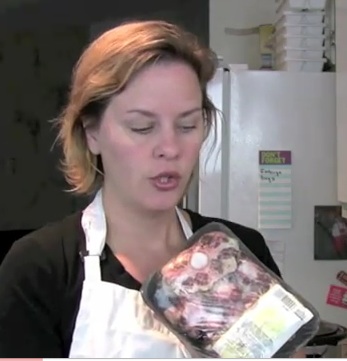
    Today I’m going to talk about the time-tested process of making bone broths in your  kitchen to restore your health.

    Today’s busy lifestyles, wide use of antibiotics and nutrient deficient foods have pre-disposed many children and young adults to unhealthy gut health resulting in sinus problems, gluten intolerance, chronic fatigue, arthritis,  allergies, and other degenerative conditions.  Having said that, I remind you I’m not a doctor but I speak based on my own experience and that of others.

    Watch the How to Make Bone Broth Video by Anne Marie Michaels
    You can easily master the art of making your own bone broths or stocks from leftover chicken, beef, or fish bones.  Add chopped carrot, celery, and onion.  Simmer for 24–72 hours.

    Bone broths are very nourishing to the intestines because they are full of natural gelatin that coats and soothes the gut and contain high amounts of calcium, magnesium, and other  trace minerals.  View the video for details.  The broths can be made into gravy, soups and stews, or even used as a tonic – type drink.  They are delicious, and thick when properly made.

    For free information, including an emailed list of things you can do to get started with better health, as well as tips, recipes and resources,  click on the
    Reversing Food Allergies On -Line Cooking Class Link .

    The 12 week class includes over 50 video demonstrations, and over 200 recipes.  Class registration goes through April 4 at the discounted price, classes start April 6.  Save $20 with coupon Code HEAL which is good through April 1.  Remember, registration is for life-time access to the materials.  Class schedule is as follows:

    • Lesson 1: Overview & Basics
    • Lesson 2: Detoxifying
    • Lesson 3: Making Stock
    • Lesson 4: Fermented Foods
    • Lesson 5: Soups & Stews
    • Lesson 6: Breakfasts
    • Lesson 7: Lunches
    • Lesson 8: Dinners – Poultry & Pork
    • Lesson 9: Dinners – Beef & Lamb
    • Lesson 10: Dinners – Seafood
    • Lesson 11: Appetizers, Snacks & Side Dishes
    • Lesson 12: Desserts

    Bonus Video:  How to Make Ghee – Free of allergens such as milk solids and lactose and safe for dairy intolerant individuals.

    Register for the 12 Week Reversing Food Allergies Class Here.

    Disclaimer: While I can’t guarantee your food allergies will be reversed by mastering the art of traditional cooking methods, I do believe your health will be improved.

    Disclosure: http://cmp.ly/5

  • Discover Waterless Cookware


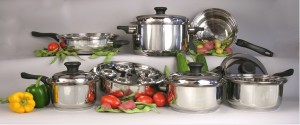
    I have had this 17 piece set of waterless cookware for nearly 10 years and only burned something once!  I love the vapor-lock lid system which insures fast and healthy food without nutrient loss, how easy these pans are to clean, and most importantly, the 304 Surgical stainless steel  is non-reactive with acid foods.  Read on for details.   Frequently Asked Questions about Waterless Cooking

    Invest in a 17 piece set of Vapo Seal Waterless Cookware
    and I will include an Omelet Pan and Shipping for FREE!

    Only $299.99 while supplies last!

    TOP 10 QUESTIONS YOU SHOULD BE ASKING
    About Selecting High Quality, Long-lasting Cookware

    1. Why should I throw away my aluminum cookware?
    Aluminum is a metal that is very active chemically and
    reacts to acidic and base foods by dissolving in the cooking
    process and can leach into your food.    When you cook in
    aluminum some of the metal is excreted into your food and
    goes into your body.  Acidic foods cause a higher level of
    aluminum to be excreted and can even cause a metallic
    taste in the food.  Research shows a link between aluminum
    and Alzheimer’s disease and because of its properties,
    aluminum should not be used to cook directly out of.

    2. Doesn’t waterless cookware contain aluminum?
    Yes.  But the aluminum is encapsulated so that it will not
    ever come in contact with your food.

    3. Why should I throw away my Teflon?
    There is numerous health risks associated with Teflon
    especially when heated to high temperatures.  It is easy to
    see after many uses just look at your pan.  Flaking Teflon
    in your body cannot be good for you.

    4. How can waterless cooking improve my health?
    If the cookware is used properly it undoubtedly has
    wonderful health benefits.  Vegetables will retain 98% of
    their natural vitamins and minerals that are essential for our
    bodies.  Most cooking methods cause vegetables to lose up
    to 50% of their vitamins and minerals.  Because the flavor
    will be better you will enjoy eating and even trying all
    types of vegetables.  Eating vegetables becomes enjoyable
    and you begin craving healthier foods in your diet.  You
    will even begin to prefer eating at home rather than eating
    out.  Last, you won’t desire fried foods as much because
    you can cook meat without grease and still have abundant
    flavor and tenderness.

    5. What is the difference between waterless surgical
    stainless steel and the stainless steel that you can buy
    at discount stores?
    The difference is in the type of stainless steel and the
    construction of the stainless steel.  Waterless cookware is
    made of a high grade Titanium base surgical stainless steel
    the same type of stainless steel as used by surgeons, and
    dairies.  Because of its nonporous properties it is a very
    sanitary metal that doesn’t rust, corrode, or collect bacteria
    like some metals.  This property is also what allows for
    greaseless cooking.  The cookware is constructed with
    several layers of elements between the steel that produce
    very quick and even heat conduction.  Where other
    stainless steel pans though may look heavy can produce hot
    spots and burn easily.

    6. What is the difference between 9 element, 12 element
    etc.?
    There is not a lot of difference in cookware that imply
    higher or lower number of elements.  This is just the
    number of the different mixtures or alloys and elements
    used in those mixtures.  It doesn’t really matter how many
    elements are used in the construction.  What matters is how
    well and evenly the cookware conducts heat.

    7. What are the handles made of?
    Most waterless cookware has handles that are made of a
    high impact bake-a-lite.  This material is resistant to
    temperatures up to 400 degrees and doesn’t get hot to the
    touch on top of the stove when cooking like a metal handle
    does.  You don’t need pot holders to take the pan off the
    stove.

    8. What does the warranty on the cookware cover?
    Some companies have been in business for many years and
    have great customer service.  Other companies are trying to
    make a quick sale on auction sites but you may never be
    able to find them or their warranty again.  Most well
    established waterless cookware companies have great
    service and warrant their cookware against any defects and
    replace handles and knobs for minimal shipping and
    handling charge.

    9. What happens if I have a defective piece of cookware
    that is no longer manufactured?
    In this case the company should replace it with a similar
    product that is currently being manufactured.  Cost is again
    usually minimal shipping and handling charge.

    T304 Surgical Stainless steel cookware sets and pieces with
    a 7 ply construction of alloys and metals for fast even heat
    distribution and vapor sealing covers to allow for waterless
    and greaseless cooking.   The 7 ply  construction allows for fast and even heat distribution and
    the Titanium based steel surface keeps meat from sticking
    without using grease due to its nonporous properties.  The
    cookware has precision ground electronically balanced
    covers that create a vapor seal to allow for waterless
    cooking.  The vapor seal holds all the heat and moisture in
    the pan without the evaporation that usually occurs in the
    cooking process.

  • How do I salvage buggy grain?


    Have you ever experienced the sinking feeling of opening a bag of grain to bug invested grain?

    It’s a bit of a sinking feeling.  But here are the tried and true remedies to save the grain!

    A customer writes: ” I just opened the bag & found many many little black bugs roaming about in the bag with some webbing also.” My supplier said that I could salvage the 50 pounds of grain by washing off the grain & letting it dry out.” Another option is to freeze the grain 48 hours to kill the bugs. What have you done to salvage grain?  Here are reader responses:

    • I just saw this today: Preventing and getting rid of weevils in the pantry http://bit.ly/g5iUUo
    • I keep mine in the freezer in airtight buckets for at least a week then store it someplace dry and cool. If I leave it in bags it goes bad, but I live in the gulf South so that makes a difference.
    • I have had this happen before. I now use a variety of strategies including freezing, diatomaceous earth, and oxygen absorbers. I don’t wash the grain – just take it out of the bag (outside) and “sift” it with my hands to get the webbing off. Then (wearing a dust mask) I add in diatomaceous earth and freeze it. I DO NOT tell my kids the grain had bugs!
    • I always recommend grain be stored cool and dry so bugs don’t come alive, or use an oxygen absorber inside a sealed pail.
    • If you don’t want to salvage it for yourself, you can feed it to the chickens as is. they don’t care about bugs 🙂
    • Always transfer grain in bags to plastic storage containers that are food quality with tight fitting lids.
    • Place an Oxygen absorber in the grain pail and then seal it tightly.

    If you are new to food storage and storing grain take mental note or print out these tips.

    Follow me at Facebook: http://www.facebook.com/urbanhomemaker

    Follow me at Twitter: http://www.twitter.com/TheUrbanHome

  • Give Away: Magnet Ball and Ultra Power Plus Combo

    magnet-balllaundry-detergent_th_3


    Give Away:  Magnet Ball and Ultra Power Plus Combo – $64.98 Retail Value is now closed.

    The winner is  entry #3:  Janet Van der Kooi.  Janet please contact me at marilyn@urbanhomemaker.com to claim your prize.

    The Magnet Ball softens hard water without the use of any chemicals or other consumable products.  Softened water will enable you to cut the amount of detergent needed by 50% in your washing machine or your dishwasher.  The magnet ball will eliminate mineral deposit build up on appliances, clothes, and dishes.  If you use this in your dishwasher it eliminates the need for a rinse agent.  This product has a five year warranty.  I’m on year three with my magnet ball and it does fantastically in my dishwasher.

    Ultra Power Plus is filler free and unscented and will not leave any residue in your clothing.  It has superior stain removing properties, whitens whites, brightens colored fabrics, cuts through grease.  Since this detergent is ultra concentrated you only use 1 tsp of detergent for a front  loader or 1 Tbsp for a top loading washer.  Use it with the Magnet ball in a top loading washer and you can cut the amount of detergent needed some more.  You will get at least 140 loads at a cost of about 15 cents per load in a top loader and 3 times as many loads in a Front Loader.

    I also use Ultra Power Plus as my stain remover by dissolving 1 Tbsp in 1/2 Cup of  water and spraying it on stains before laundering.

    Here is how to participate in future Urban Homemaker Contests.

    This contest will end Monday March 7, 2011 and the winner announced on March 8.

    There are up to five ways to enter the contest!

    You get one contest entry for each of the following steps you take and you post that you did it in  the comments section of this blog page below:

    1.  Post this article to your Facebook page and tell me you did so in the comments section below.

    2.  Post this article to your Twitter page and tell me you did so in the comments section below.

    3.  Sign up for receiving The Urban Homemaker blog posts by email above, and tell me you did so below in the comments.

    4.  Mention this contest in your blog posting and link back to this page and post your blog link in the comments section below.

    5.  Sign up to receive The Urban Homemaker Enewsletter, and tell me you did so below in the comments.

    Follow me at Facebook: http://www.facebook.com/urbanhomemaker

    Follow me at Twitter: http://www.twitter.com/TheUrbanHome

  • Monday Morning Mix

    Happy Valentine’s Day to you All.  I wanted to remind you that today is the last day of the Wondermill and Wondermill Junior old pricing.   I also wanted you to have this  fantastic and simple Chocolate Peppermint Custard for your Valentine’s and an opportunity to learn something from Penny Pinchin Momma.  (details follow)

    Last Day for Old WonderMill Prices – $239.95 today, $259.95 tomorrow – February 15, 2011
    Last day for Old Wondermill Junior price – $199.95 through February 14, 2011 – $219.95 starting February 15, 2011 -Includes free shipping, new auger, clamp, stainless steel burrs – the complete package!
    This recipe is courtesy of Cooking Traditional Foods, the longest running menu mailer based on the work of Weston A Price.

    This pudding recipe comes out thick and rich.  It’s great as a cake filling or in a custard cup.  You can change out the extract for different flavors.  When my kids want pudding, this is the recipe I use.

    4 egg yolks

    1 Tbs cornstarch

    1 (14-ounce) can coconut milk

    ½ cup chocolate chips

    1 tsp peppermint extract


    In a bowl, whisk together the egg yolks and cornstarch until smooth. Set aside.

    In a medium saucepan, heat the milk and chocolate over medium heat until the chocolate is completely dissolved. Bring to a boil, remove from the heat, and cool briefly.

    Whisk ¼ cup of the chocolate mixture into the egg yolk mixture. Whisk in the remaining milk in a slow stream. Return to the saucepan and heat to a simmer and cook for 5 minutes. Do not boil.

    Remove from the heat and cool, whisking regularly to avoid a skin forming on top and keep the fat incorporated, until only slightly warm. Stir in the peppermint extract. Chill thoroughly in the fridge before serving, or use as a cream filling for cakes, cupcakes or the like.

    If your family likes sweeter desserts, you can stir in plain or chocolate flavored stevia with the peppermint extract. Unsweetened chocolate and a little rapadura or your favorite chocolate bar can be substituted for the chocolate chips. Orange, vanilla or another extract that would match chocolate can be used in place of the peppermint.

    Kerry Ann Foster is the owner of Cooking Traditional Foods Menu Mailer

    Penny Pinchin’ Mama e-book, Jill Cooper, who raised two teenagers alone while making only $500 per month, shares practical hints and strategies she used to make the most out of every dollar. The regular price is $12.95 and this week only it is 50% off or $6.48.

    Follow me at Facebook: http://www.facebook.com/urbanhomemaker

    Follow me at Twitter: http://www.twitter.com/TheUrbanHome

  • Get Those Dirty Dishes out of the Sink!

    Kitchen Cabinet Installation is Completed
    Kitchen Cabinet Installation is Completed

    Ed Note: I’ll confess up front, I’m not always diligent about keeping up with the dishes and there are only two of us living here right now.  But I so love a tidy kitchen, especially my beautiful remodeled kitchen with its beautiful cabinets and count tops.  I assure you, my kitchen now has a lived in look but this picture is a good reminder of what I need to aspire to daily.

    Dirty Dishes Cause Debt! by Jill Cooper (guest post)
    www.livingonadime.com

    The other day I was asked one of the most common questions that people ask me: “Where do I start if I want to get out of debt?” After telling me of her huge credit card debt and how they eat out almost every night, the lady took a deep breath and said, “How do I save on laundry detergent and cleaning supplies?” Sometimes we can’t see the forest for the trees.

    Even though saving money on cleaning supplies does help and should be part of your plan, that usually isn’t where the biggest problem with the debt lies. This woman never once thought to ask me how to stop eating out so much. Most people don’t want to face the real causes of their debt because their biggest problems are the things they like the most. Going out to eat is one of the top five causes of debt.

    Get those dirty dishes out of the sink!!

    We go out to eat because we can’t face a dirty kitchen. Keeping your kitchen empty of dirty dishes is the key to saving money. This is probably the #1 way to start getting out of debt. Most people are so overwhelmed with piled counter tops and dirty dishes that they would rather go out to eat than face a dirty kitchen.

    Do the dishes after every meal and keep hot soapy water in the sink while you are baking or cooking. Clean as you go. If your sink is empty and the dishes are washed, your kitchen always looks good. This helps you save money because you have the time and space to cook.

    To get in and out of the kitchen quickly, try these easy steps:

    1. Put all dirty dishes in the dishwasher. Fill the sink with hot soapy water and put the hand washables in it to soak.
    2. Wipe off counter tops and tables with hot soapy water. (This way, if you have unexpected company, at least your table and counters will be clean.)
    3. Sweep the floor and shake throw rugs if needed.
    4. Wash the dishes that have been soaking.
    5. Wipe down the faucets and dry with a towel. (Be sure to wipe any sticky appliances, too.)
    6. Put out a clean dish rag and towel.
    7. Take out the trash.

    These simple steps can help you start climbing your way out of debt. You will be amazed how much better you will feel just having the kitchen clean.

    Right now the smart folks at Living on a Dime are having their New Year’s Ebook Extravaganza.  13 ebooks for $13.00. Check it out.

    Follow me at Facebook: http://www.facebook.com/urbanhomemaker

    Follow me at Twitter: http://www.twitter.com/TheUrbanHome